퍼블리셔 취업을 위해 제대로 배워보는 html과 css, 그리고 웹표준
1. 프로그램 설치 및 준비
1-1. emmet(zen-coding) 설치
Download - Sublime Text
Sublime Text 3 is the current version of Sublime Text. For bleeding-edge releases, see the dev builds. Sublime Text may be downloaded and evaluated for free, however a license must be purchased for continued use. There is currently no enforced time limit f
www.sublimetext.com

Not portable version
실행은 간단하다.
https://packagecontrol.io/installation
Installation - Package Control
Installation Use one of the following methods to install Package Control: Command Palette Open the command palette Win/Linux: ctrl+shift+p, Mac: cmd+shift+p Type Install Package Control, press enter This will download the latest version of Package Control
packagecontrol.io
서브라임 텍스트에 package기능 추가.
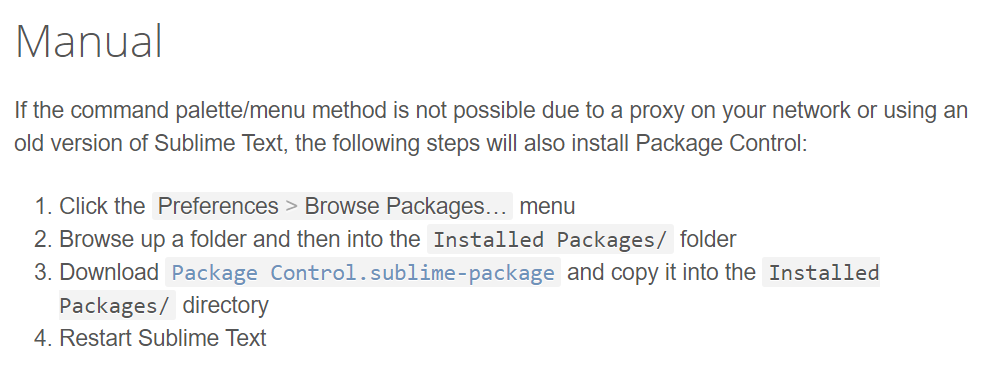
3번 클릭.
자동 다운로드
Preference > Browse Packages

상위 폴더로 가서 위 경로에, 다운받은 파일 옮기기

Preference > Package Control이 생긴다.


install Package, Emmet 검색해 클릭 > 자동 다운로드
1-2. dummy text, dummy image 작성방법

! + Tab을 누르면 위가 자동으로 설정된다.
lorem + Tab을 누르면 아래와 같이 적당한 길이의 텍스트가 만들어진다.


lorem5 <-- 이렇게 하면 5개의 단어가 만들어진다.
<!DOCTYPE html>
<html lang="en">
<head>
	<meta charset="UTF-8">
	<title>Document</title>
</head>
<body>
<img src="http://placehold.it/800x600" alt="">
</body>
</html>
img + tab 후에 placehold 어쩌고를 타이핑한다.
빈화면에서 오른쪽 버튼 클릭하면 바로 Browser에서 열어볼 수 있는데,
크롬으로 뜨지 않는 경우는 해당 파일 속성 > 연결프로그램에서 직접 크롬으로 바꿔준다.

htt[s://placeholder.com
사이트에서 이미지에 대한 설정 예시를 볼 수 있다.
<!DOCTYPE html>
<html lang="en">
<head>
	<meta charset="UTF-8">
	<title>Document</title>
</head>
<body>
<img src="http://placehold.it/800x600/ff0000?text=Sample photo" alt="">
</body>
</html>
2. html 작성 기초
2-1. 웹 표준이란?

국내에서는 웹 접근성 연구소가 있다.
지침에 대한 설명 및 예제들도 친절하게 게시되어 있다.
<!DOCTYPE html>
<html lang="en">
<head>
	<meta charset="UTF-8">
	<title>Document</title>
	<link rel="stylesheet" href="css/style.css">
	<script src="js/common.js"></script>
</head>
<body>
</body>
</html>
이렇게 파일을 분리하는 것이 웹 표준의 기본이다.
2-2. html 태그 작성 문법
<!DOCTYPE html>
<html lang="en">
<head>
	<meta charset="UTF-8">
	<title>Document</title>
</head>
<body>
	<p>Lorem ipsum dolor sit amet, consectetur adipisicing elit. Sint doloribus nulla soluta minima. At voluptatem aperiam asperiores itaque provident. Delectus exercitationem optio deleniti, voluptatibus maiores facere aspernatur maxime laboriosam, ex! </p>
	<input type="text"/>

</body>
</html>
<input><br><hr> 등 종료 태그가 없는 것도 있지만 대부분 <p></p>와 같이 종료 태그를 해주어야 함.
xhtml에서는 꼭 <hr/>과 같이 종료 표시를 해 주어야 한다.

속성은 ""로 구분.
<!DOCTYPE html>
<html lang="en">
<head>
	<meta charset="UTF-8">
	<title>Document</title>
</head>
<body>
	<p style="color:red">Lorem ipsum dolor sit amet, consectetur adipisicing elit. Sint doloribus nulla soluta minima. At voluptatem aperiam asperiores itaque provident. Delectus exercitationem optio deleniti, voluptatibus maiores facere aspernatur maxime laboriosam, ex! </p>
	<input type="text"/>

<br>
<table>
	<tr>
		<td>cell</td>
	</tr>
</table>
</body>
</html>
종료 태그를 쓰지 않아도 지장이 없는 경우가 있지만 가급적 써 준다.
(협업할 때 헷갈림)
ctrl+shift+tab을 해 주면 자동 들여쓰기-내어쓰기가 가능하다.
2-3. 문서형 선언, 언어 지정, 문자 코드셋 지정하기
<!DOCTYPE html>
<html lang="en">
<head>
	<meta charset="UTF-8">
	<title>Document</title>
</head>
<body>

</body>
</html>
위의 lang 은 언어, charset은 문자 캐릭터 셋, 이 때 charset이 title보다 뒤에 있으면 title이 깨질 수도 있다.
주석은 <!-- -->
html은 html4 -> xhtml1.0 -> html5 순으로 발전해 왔는데 xhtml은 문법이 엄청 엄격했다.
doctype declaration도 여러개가 있는데, Strict는 가장 표준에 맞는 형식이고 Transitional은 유연하게 선언하는 것,
Frameset은 웹페이지 여러개를 하나의 문서에 띄울 때 쓰이게 된다.
XHTML은 strict 타입만 존재한다.
html4에서는 <meta http-equiv="Content-Type" content="Text/html; charset=UTF-8"/> 문자 코드셋 지정이다.
xhtml의 경우 xml도 문서에 포함할 수 있다.
<html xmlns="http://www.w3.org/1999/html" xml:lang="ko" lang="ko">
<head>
<meta http-equiv="Content-Type" content="Text/html; charset=UTF-8">
필요할 경우 구글에 doctype declaration이라고 검색하면 많이 나옴.
2.4 meta 요소 알아보기
<!DOCTYPE html>
<html lang="en">
<head>
	<meta charset="UTF-8">
	<meta name="keywords" content="">
	<!-- 이 웹페이지에서 대표되는 단어들을 쉼표로 나열-->
	<meta name="description" content="">
	<!-- 이 웹페이지의 설명을 적음. 구글 검색에선 keywords보다 description을 검색에 더 선호한다 -->
	<meta name="author" content="">
	<meta name="generator" content="">
	<!-- 웹페이지를 만들 때 어떤 framework를 썼는지 -->
	<!-- 저작권 : copyright, 연락처 : reply-to -->
	<meta name="robots" content="index, follow">
	<!-- 검색이 되도록 하기 위해 지정하는 값, 인덱스 = 수집 및 색인 허용, 팔로우 = 연결된 페이지도 허용한다 -->
	<!-- "noindex, nofollow" (="none" ) 이런 식으로 적용 가능 -->
	<title>meta elements</title>
	<meta property="og:title" content="페이지 제목">
	<!-- og = open graphic -->
	<meta property="og:url" content="http://사이트 주소/">
	<meta property="og:image" content="http://띄울이미지">
	<!-- SNS에서 링크 띄울 시 나오는 이미지-->
	<meta property="og:type" content="website">
	<meta property="og:description" content="">
	<!-- 트위터에 대해서도 이런 것이 있다. meta name="twitter:속성"으로 많이 쓰인다. -->
	<meta http-equiv="refresh" content="10; url=http://example.com/">
	<!-- 10초 후에 example.com으로 이동한다 -->
</head>
<body>

</body>
</html>
반응형 웹을 만들 땐 viewport를 작성하게 된다.
<meta name="viewport" content="width=device-width, initia-scale=1">
2.5 html 템플릿 작성하기
opera mobile classic emulator를 다운로드 받으면 모바일 화면에서의 웹 화면을 테스트 해볼 수 있다.
nuli라고 네이버에 검색하면 네이버에서 배포하는 코드 가이드라인을 볼 수 있다.
전체는 #wrap, 헤더는 #header, 본문은 #container, 아래는 #footer
<!DOCTYPE html>
<html lang="en">
<head>
	<meta charset="UTF-8">
	<meta name="viewport" content="width=device-width, initial-scale=1.0">
	<meta name="description" content="">
	<title>template</title>
</head>
<body>
	<p><a href="#container">본문 바로 가기</a></p>
		<!-- 웹페이지에 메뉴가 바로 보이지 않더라도 tab키를 누르면 본문 바로 가기 버튼이 보이는 것이 좋다.-->
	<div id="wrap">
		<!-- header -->
		<div id="header">

		</div>
		<!-- //header -->
		<div id="container">

		</div>
		<div id="footer">

		</div>
	</div>
</body>
</html>'개발 공부 > html & css' 카테고리의 다른 글
| 제대로 배워보는 html과 css, 그리고 웹표준 7. 테이블~8. 배치 스타일 (0) | 2020.09.11 |
|---|---|
| 제대로 배워보는 html과 css, 그리고 웹표준 5. 폰트~6. 배경 스타일 (0) | 2020.09.10 |
| 제대로 배워보는 html과 css, 그리고 웹표준 5.css기초 (0) | 2020.09.09 |
| 제대로 배워보는 html과 css, 그리고 웹표준 4. 웹페이지 코딩 실습 (0) | 2020.09.09 |
| 제대로 배워보는 html과 css, 그리고 웹표준 3.각종 html요소 알아보기 (0) | 2020.09.09 |


